Floppy Emu Case Assembly (Old Version)
These instructions are for the older generation (before September 2020) flush-edged acrylic case. Instructions for the current generation sandwich-style case are available here.


The front and back side pieces are interchangeable. The case screw length is 25 mm. Your package may also include a set of shorter screws – you will not need these.
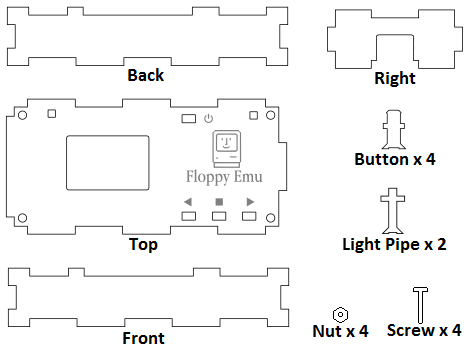
1. Confirm all the necessary parts are present.
2. Remove the protective cover film from both sides of each laser-cut piece. The cover film may be clear plastic with green markings, or plain brown paper. Use a fingernail to scrape up one corner of the film, then pull on the corner to remove the rest of the film.
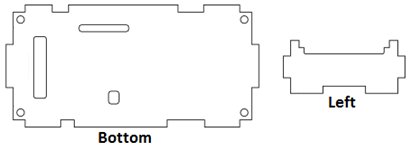
3. Place the bottom case piece on a flat surface, oriented so the two long cut-out slots are at the top and left. Put the Floppy Emu board on top. Ensure the board is oriented correctly: the solder bumps on the underside of the board should fit into the cut-outs in the bottom piece.
4. Press the front, back, left, and right side pieces into place, surrounding the Emu board. The pieces are uniquely shaped to guarantee they will only fit in the correct spot. Use clear tape to temporarily hold together the bottom and sides while you continue the assembly.
5. Plug the extension connector cable into the Emu board.
6. Use clear tape to temporarily cover the rectangular and square holes in the top piece. This will help to hold the buttons and light pipes in place during final assembly.
7. Insert all the buttons and light pipes into the holes in the top piece, pushing them up from the underside so that they make contact with the tape. The buttons and light pipes should stay fixed in the top piece, and hang down below the top piece. Orient the light pipes horizontally, with their arms extending left and right.
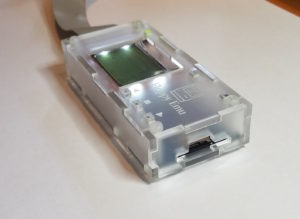
8. Lower the top piece (with the buttons and light pipes attached and hanging below it) down onto the bottom pieces, completing the case.

9. Insert screws into each corner hole and secure them with nuts, finger-tight. Be careful not to over-tighten the screws.
10. If any buttons are stuck in the down position, or don’t “click” when pushed, loosen the bottom-right screw slightly.
11. Remove the tape. You’re done!
Comments are off for this post


