

BMOW Is Alive!
Everything seems to be falling into place now. I think a picture says it best:
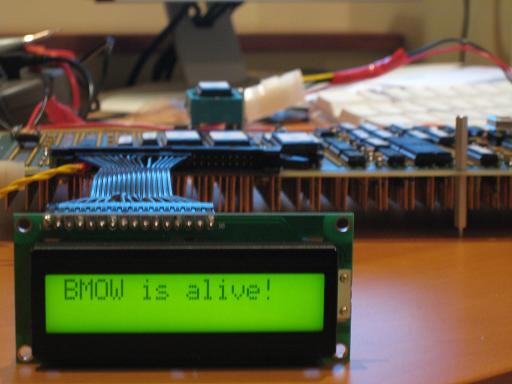
The LCD is up and running, displaying messages from the ROM program. I wasn’t lucky enough to have it work on the first try this time, though. I had to debug some accidentally swapped address lines and some uninitialized registers, but after a few hours of fiddling, I was rewarded with the greeting in the photo.
I’m starting to realize a few bad points about my physical setup. The biggest headache is getting chips in and out of the wire wrap board to reprogram them. They’re always hard to remove, and even with a chip puller, I’m afraid I’m going to damage or break a pin when the chip suddenly dislodges. I have my boot ROM in a ZIF socket, but all the microroms are in standard (non-ZIF) sockets, and the GALs aren’t socketed at all. What’s worse, the microrom sockets don’t seem to be making a consistent contact with the board. In one case, I was able to toggle the machine between working and not working just by pushing down on one of the microrom sockets a little. This is the sort of random, elusive electrical problem that worries me far more than any design problems.
Things are getting to the point where I really need a case or cabinet of some sort. I don’t necessarily want to put it in the PC case yet, since then I’ll have to be constantly removing it to work on the hardware. But the naked wirewrap board with power, reset, and LCD cables hanging off in random directions is getting pretty unwieldy. I’m thinking about constructing a temporary “development” case that’s more like a frame. It would provide something to easily grip everything by, and a place to anchor the cables and connectors, but still be totally open at the top and bottom. I’m hopeless with machine tools, but maybe I can cobble something half-respectable together with some scrap wood and screws.
Read 2 comments and join the conversation2 Comments so far
Leave a reply. For customer support issues, please use the Customer Support link instead of writing comments.
Hey, quick question: I’ve seen the kind of mainboard you are using, but where did you get it and how much did it cost?
Also: What terminals/sockets/DIP Packages do you use to get wire wrap pins? I bought a bag of 1000 for general purpose, but they aren’t IC socket type. They’re different kinda wire wrap connectors.
Also: What products do you actually use to wrap and what is your technique? I have some blue kynar wire that I am winding with a manual radioshack tool and it isn’t as great as I’d hoped.
Reply here or send me an email. Either way, very good job on the computer!
The board is a used Augat wire wrap board that I purchased from eBay for $40. I think they cost several hundred dollars when new. It already has wire wrap pins built into the board, so I didn’t need to purchase any sockets for wire wrapping.
I’m using a hand wire wrapping tool that I purchased from Electronics Express, which I think cost me $12. Your Radio Shack tool is probably similar. It took me a long time to get proficient with it, but I think I’ve got the hang of it now. Using pre-cut Kynar wire that I bought from Phoenix Enterprises, I can do about 60 wires in an hour.
Many people swear by the motorized wire wrapping guns. I’ve never used one, but I’m not sure how much faster it would really be. Most of the time is spent selecting the right wire to use, threading it into the tool, and triple-checking that I’m wrapping onto the correct pin. Actually spinning the wire onto the pin only takes a couple of seconds.