Archive for November, 2014
Building uClinux for a 68000 Target
![]()
Compiling the Linux kernel is fun! uClinux is a version of regular desktop Linux that’s designed for low-end embedded hardware, especially CPU’s that lack a memory management unit and can’t support virtual memory. It looks like a good fit for my 68000 single board computer project, so I’ve begun getting familiar with the uClinux source code and how to build it. My plan is to first build a uClinux image for some similar 68000-based system that’s already supported in the kernel tree, and then modify the source code as necessary to support my custom board.
In theory the process should go like this: download the uClinux source code, run a config program to choose the hardware target and kernel options that you’d like, then compile the code to produce a finished kernel image. And that’s true, but it skips over a huge number of details and gotchas, as I discovered along the way. The real challenge was finding an operating system, version of the uClinux source, version of the compiler toolchain, and version of the standard C library that all worked together. That proved to be much more challenging than I would have ever imagined!
TL;DNR
Here’s what finally worked for me for two existing 68K-based boards.
Arcturus uCsimm, 3.x kernel – Ubuntu 14.04 64-bit with libncurses5-dev package installed, 20140504 full source distribution of uClinux, 20130217 m68k-uclinux precompiled toolchain, uClibc selected as the C standard library.
Weiss SM2010, 2.0.x kernel – Ubuntu 12.04 32-bit with libncurses5-dev package installed, 20040218 full source distribution of uClinux, 20030314 m68k-elf precompiled toolchain, uC-libc selected as the C standard library.
If you don’t care much about build details, but are interested in how the compiled kernel boots on 68K hardware, skip the sections below and jump to the end.
Host OS
Step 1 is setting up a build computer with a Linux operating system. I chose to use Ubuntu, a popular and well-supported Linux distribution. But what version of Ubuntu? As I later discovered, the Ubuntu version number wasn’t very important, but the choice of 32-bit or 64-bit Ubuntu was critical. If you anticipate using pre-compiled 64-bit toolchain binaries (described further below), you must use 64-bit Ubuntu. If you anticipate using pre-compiled 32-bit toolchain binaries, you should use 32-bit Ubuntu. All but one of the precompiled toolchains I found were 32-bit binaries, so I recommend using 32-bit Ubuntu. This is sometimes also called x86, and 64-bit is sometimes called x86_64 or amd64.
Supposedly it’s possible to run 32-bit binaries on 64-bit Ubuntu, but I was never able to get it to work. The way it fails is almost comical, too. Say you’re running 64-bit Ubuntu, and you’ve got a program binary called tool in your current directory. Unknown to you, the program was compiled as a 32-bit binary. When you attempt to run the program at the command prompt, you’ll see this:
user@ubuntu$ ./tool

bash: ./tool: No such file or directory
What do you mean, no such file or directory? It’s right there!
Attempting to run a 64-bit binary on 32-bit Ubuntu generates a slightly more useful error message “cannot execute binary file”. When in doubt, the file command (type file <filename>) will tell you if a program binary is 32-bit or 64-bit.
If you don’t have a spare PC ready to dedicate to an Ubuntu install, VirtualBox is a convenient way to run Ubuntu as a virtual machine within a Windows environment. virtualboxes.org has many pre-built OS images for Virtual Box, including many for Ubuntu, which will save you the trouble of going through the Ubuntu install process in the VM.
uClinux Source Code
The source code for uClinux can be downloaded here. Should you just grab the newest version? Maybe not, if you’re targeting a specific board or a custom board with very limited resources. The latest version of the source (currently 20140504) has dropped support for building 2.0.x kernels, and only 2.4.x or 3.x kernels are supported. The configs for some useful older boards (useful to 68K hackers anyway) like the Weiss SM2010 were never updated after kernel 2.0.x, so kernels for those boards can’t be built from the latest uClinux source.
Even if the board you’re interested in is supported in newer kernels, you may wish to build an older kernel to reduce ROM and RAM requirements. Using the latest uClinux source, an image for the Arcturus uCsimm board using the 3.x kernel was 3 MB, but an image for the same board using the 2.4.x kernel was only 1.7 MB. That’s a huge savings. And using a 10 year old version of the uClinux source, an image for the Weiss SM2010 using the 2.0.x kernel was only 870K! Hello, bloat.
There’s a hidden gotcha in the uClinux source distributions: the included user applications (telnet, busybox, etc) and standard C libraries continue to evolve, while the actual kernel source code and board configs don’t. Over time this can break things without anyone noticing. For example, I tried to build the Weiss SM2010 2.0.x kernel image, using the 20070717 source distribution of uClinux. This failed during compilation of busybox, with a “dereferencing pointer to incomplete type” error in ping.c. This was probably due to me using an older toolchain from 2003, which was necessary to compile the 2001-vintage kernel 2.0.x source. When I switched to the 20040218 source distribution of uClinux, the ping.c error disappeared.
For best results, the source distribution of uClinux and the precompiled toolchain should be from the same year as the kernel source you’re building, and the board config files. If you want to build 2.0.x kernels, then use old uClinux source distributions from back when 2.0.x was semi-current – 2001 to 2004 or thereabouts. Failure to do this can lead to all sorts of crazy compile errors, as I discovered.
The uClinux source distributions come as .gz or .bz2 files. To uncompress them, copy them to your Ubuntu home directory, and then type
tar xvf uClinux-dist-YYYYMMDD.tar.bz2
or
tar xzvf uClinux-dist-YYYYMMDD.tar.gz
Toolchain
The toolchain contains required tools like the 68K cross-compiler, and elf2flt conversion tool. You might think these would be included in source form with the uClinux source distribution, but that’s not how it works: you need to provide your own toolchain. This page has links to many precompiled toolchain versions for uClinux with 68K targets. If possible, use a toolchain from the same year as the source code you’re compiling.
Somewhere along the way, the uClinux 68K tools appear to have all been renamed from m68k-elf-* to m68k-uclinux-*. For example, the compiler in newer toolchains is m68k-uclinux-gcc, and in older ones it’s m68k-elf-gcc. If you installed the toolchain, but your kernel compile fails because it can’t even find the compiler, this is probably the reason. Install a newer or older version of the toolchain to get a compiler with the right name, and avoid a pile of confusing compilation errors.
As mentioned in the introduction, you also need to make sure the precompiled binaries in the toolchain match the requirements of your OS. 32-bit Ubuntu needs 32-bit toolchain binaries. It should be possible to compile the toolchain itself from its source code, but I found very little documentation about this and didn’t try it.
Precompiled toolchains are typically distributed as shell files with a compressed payload appended. To install them, you copy them to the Ubuntu / (root) directory, and then type:
sudo sh ./m68k-uclinux-tools-YYYYMMDD.sh
This installs the tools under /usr/local. Most toolchains were easy to install, but I ran into a problem with the 20030314 version of the toolchain, and had to do a little script hacking. The script uses tail to pipe its compressed payload to gunzip, but it appears to have been written for an older/different version of tail than what’s included in Ubuntu 12.04. It’s missing the -n flag needed to tell tail how many lines to skip, so it interprets the line count as the filename and complains:
tail: cannot open '+43' for reading: No such file or directory
I tried to edit the script, but the editor screwed up the binary data in the payload. Finally I just unpacked the data myself without running the script at all:
user@ubuntu$ tail -n +43 m68k-elf-tools-20030314.sh | gunzip > tools.tar

user@ubuntu$ tar xvf tools.tar
Standard C Library
The standard C library is a small bit of code that implements functions like strcpy(). Under uClinux, there are three choices for the standard C library available in the config menu: uClibc, uC-libc, and glibc. Yes, there are two entirely different libraries whose names differ only by a hyphen. As I understand it, uC-libc was the original standard C library for uClinux, but has now been mostly replaced by uClibc.
If building a modern kernel, you most likely want to select uClibc, but for older kernels it’s unclear. I tried building the Weiss SM2010 2.0.x kernel with uClibc, but it eventually failed during compilation of __assert.c:
cc1: error: unrecognized command line option "-mlittle-endian"
All the references I could find to this error on the web were related to ARM compilers. After some digging, I discovered that the Weiss SM2010 configs were just totally broken with respect to uClibc: vendors/Weiss/SM2010/config.uClibc was set up for an ARM target, not 68K! The original authors clearly never used uClibc then, and that file was probably just copied from some other board config. I switched to using uC-libc, and everything built without errors.
Building It All
Once you’ve got the uClinux source and the toolchain installed, it’s time to configure the build options. Cd into the directory containing uClinux source and type make menuconfig. If you’re lucky, after a few moments you’ll see a terminal-based menu program. If you’re not lucky, make menuconfig will fail with a cryptic-looking error.
The most likely failure is an error about curses.h not being found. This is because you’re missing the curses library, needed for fancy terminal graphics and cursor control. To install it, type sudo apt-get install libncurses5-dev. If you’re building xconfig instead of menuconfig, you may also be missing gtk+ (sudo apt get install gtk+2.0-dev) and libglade (sudo apt-get install libglade2-dev).
If you’re using the latest version the uClinux source, and running on 32-bit Ubuntu, you’ll also fail with a linker error about 64-bit incompatible linkage types:
/usr/bin/ld: i386:x86-64 architecture of input file 'zconf.tab.o' is incompatible with i386 output
This is because the person who prepared the uClinux source distribution accidentally left in some 64-bit .o files in the config directory. Delete the offending .o files in config/kconfig, type make menuconfig again, and this time it should work.
The config menu is used to select the vendor and board to target, the C standard library to use, the user space programs to compile, and other options. Make your choices here, then exit. This will save a config file to be used during kernel compilation.
If you’re targeting a pre-3.x kernel, now type make dep. This isn’t necessary for 3.x kernels.
Finally, type make to start the build process. This will run for a long time, filling your screen with thousands of lines of compiler messages. If you’re successful, an image file named something like image.bin will be produced in the images/ subdirectory – this is the actual file that should be downloaded/bootloaded/flashed to the target board. If you’re unsuccessful, compilation will fail somewhere, and you’ll spend hours troubleshooting your source distribution, toolchain, and build settings.
The first target I tried was the Arcturus uCsimm board with a 3.x kernel. The build always failed with a linker error while linking the telnet daemon, telnetd:
/usr/local/m68k-uclinux/bin/ld.real: cannot find -lutil
I think this has something to do with the standard C library, but I never figured it out. I disabled compilation of telnetd using menuconfig. I also got linker errors related to something called libmpc:
/usr/local/libexec/gcc/m68k-uclinux/4.5.1/cc1: error while loading shared libraries: libmpc.so.2:
I thought this was due to a missing package. However, there is no libmpc2 package available for Ubuntu 64-bit. I was finally successful by installing libmpc3, and creating a symlink from libmpc.so.2 to libmpc.so.3. That feels evil.
The uCsimm build always concludes with the error:
cp: cannot create regular file '/tftpboot'
Looking at the Makefile, this error can be safely ignored.
The second target I tried was the Weiss SM2010 with a 2.0.x kernel. This one took a while to find the right combination of OS, uClinux source, toolchain, and C standard library as described above. But once those were in place, it built cleanly with no errors.
Deconstructing image.bin
So now that you’ve got an image.bin file (or sm2010.rom in the case of the Weiss board), what do you do with it? What is this file anyway? That’s what I wondered, so I opened it with a hex editor and started looking around. It didn’t take long to discover that it’s just a regular 68000 program, with a lot of extra stuff attached, including a filesystem image.
The uCsimm image begins with a very recognizable 256-entry 68000 vector table, which is supposed to appear at address 0 in the 68000’s memory space. The table specifies a reset vector of 0x10C10400, so presumably ROM is mapped to address 0x10C10000 on that board, but is also temporarily mapped to 0x00000000 during startup – a common 68000 trick also employed by the Macintosh. 0x400 is the size of the vector table that must be skipped to get to the code entry point, so 0x10C10000 ROM base plus 0x400 vector table size equals the 0x10C10400 reset vector.
I was later able to confirm my guess about the uCsimm’s ROM memory map: vendor/Arcturus/uCsimm/config.linux defines CONFIG_ROMBASE as 0x10C10000 and CONFIG_ROMSTART as 0x10C10400.
The SM2010 image doesn’t contain a vector table, and the code entry point looks to be the first byte in the file. Presumably its vector table is hard-wired, or is updated through some other means.
OK, so what code is at the entry point? What does it do? By copying the bytes from the image file into this awesome online disassembler, I found the answer. The boards have similar init code, though they’re not identical. Here are the first instructions for the SM2010 board:
4e71         nop
46fc2700     movew #0x2700,%sr
2e7c000ffffc moveal #0x000ffffc,%sp
207c00e62bb8 moveal #0x00e62bb8,%a0
227c00000400 moveal #0x00000400,%a1
247c00008f80 moveal #0x00008f80,%a2
2018         movel %a0@+,%d0
22c0         movel %d0,%a1@+
b5c9         cmpal %a1,%a2
6200fff8     bhiw 0x0000001e
207c00008f80 moveal #0x00008f80,%a0
227c000239f0 moveal #0x000239f0,%a1
20fc00000000 movel #0,%a0@+
b3c8         cmpal %a0,%a1
6200fff6     bhiw 0x00000034
48780000     pea 0x00000000
487900000400 pea 0x00000400
486f0004     pea %sp@(4)
48780000     pea 0x00000000
4eb900e00570 jsr 0x00e00570
So let’s see. Moving 0x2700 to the status register, that will disable interrupts on the 68000. Then it’s initializing the stack pointer to 0x000ffffc, which is presumably the top of RAM. After that there’s a copy loop, and about 35K bytes of data are copied from 0x00e62bb8 to 0x00000400. This must mean the former address is part of ROM, and the latter is RAM. Next it fills memory with zeroes from 0x00008f80 to 0x000239f0. It concludes by pushing some hard-coded values on the stack, and jumping to 0x00e00570, another ROM address.
After some extended sleuthing, I finally found that this code comes from /linux-2.0.x/arch/m68knommu/platform/68000/SM2010/crt0_rom.S. Here’s the commented source version:
	nop
	movew	#0x2700, %sr		/* disable interrupts: */
	moveal	#_boot_stack, %sp	/* set up stack at the end of RAM: */

	/* Copy data segment from ROM to RAM */
	moveal	#__data_rom_start, %a0
	moveal	#__data_start, %a1
	moveal	#__data_end, %a2

	/* Copy %a0 to %a1 until %a1 == %a2 */
LD1:
	movel	%a0@+, %d0
	movel	%d0, %a1@+
	cmpal	%a1, %a2
	bhi	LD1

	moveal	#__bss_start, %a0
	moveal	#end, %a1

	/* Copy 0 to %a0 until %a0 == %a1 */
L1:
	movel	#0, %a0@+
	cmpal	%a0, %a1
	bhi	L1

	pea	0
	pea	env
	pea	%sp@(4)
	pea	0
        jsr start_kernel
Aha! So this code looks like it’s designed to run directly from ROM, and it begins by setting up the RAM-based .data and .bss segments.
I found the code for start_kernel, and that’s where things began to look complicated. From what I can tell, the kernel isn’t actually meant to be launched directly, but rather it expects to be passed command line arguments from a bootloader. I’m guessing those pea instructions are the SM2010’s way of passing an empty argument list to the kernel.
What’s Next
That’s as far as I’ve gotten with deconstructing uClinux. I’m still a long way from having a Linux image I can try programming to my custom 68000 board, either the current breadboard version or the planned PCB version with extra memory and peripherals. But I feel like I’ve taken some important steps in understanding how uClinux is put together, how to build it, and how it boots. Now I’ll focus on creating a new uClinux target for my custom board, with the right memory map and set of peripherals. I don’t know what that involves, but I’ll find out!
Read 4 comments and join the conversationBreadboarding the 68K

My 68K breadboard computer is alive! It’s always a thrill when a pile of random chips does something recognizably computer-ish for the first time. Blinking some LEDs in sequence is great; running BASIC is super extra great. I’m excited.
This simple breadboard machine is a prototype of the 68000 single board computer I plan to build next. By testing the key design ideas in a breadboard prototype, I hope to uncover any lurking design problems while they’re still easy to find and fix. Once the design is committed to a PCB with lots of tiny surface-mount components, it will be much more difficult to make changes. Even probing specific signals to observe what’s happening may be difficult. The breadboard is a much more forgiving place to experiment and learn.
Compared to my plans for the final 68000 machine, this breadboard version has less memory, a lower clock speed, a narrower data bus, fewer peripherals, no interrupts, and glue logic built from discrete chips instead of a CPLD or FPGA. Except for the serial interface, the whole thing was built entirely from parts I had on hand. The specs are:
- 68008 CPU running at 2 MHz
- 256K Flash ROM
- 512K SRAM
- USB to parallel serial port
- 8 addressable LEDs for debugging
- Miscellaneous 74LS and 74HCT chips for address decoding and glue logic
The computer doesn’t use interrupts – it always runs at the highest interrupt level, and polls the serial port when it needs input. It also doesn’t use any of the CPU’s DMA or legacy 6800 peripheral support. There’s no handshaking for memory accesses either. The /DTACK signal that devices are supposed to use to indicate a successful memory transfer is just hard-wired to ground – the so-called DTACK Grounded approach to system design.

The Build
Getting the machine up and running went surprisingly smoothly, and only took six days of occasional work. The biggest challenges were the hidden 250 mA PTC fuse in my power supply, and noise in the /RESET signal. Other than that, it was just a matter of placing all the chips on the breadboard and stringing a few hundred wires to connect them.
It was tedious work to perform all the address decoding with discrete logic instead of a CPLD. It’s so nice to type a Verilog equation like /CS = A19 * A18 * /AS * (/F0 + /F1 + /F2), and so annoying to wire up the equivalent equation from a bunch of individual AND, OR, and NAND gates. I quickly ran out of gates, and wasn’t able to decode the address space as fully as I’d hoped, or cover all the reset-related edge cases. It gave me new respect for how useful even a tiny CPLD can be for consolidating glue logic.
The first test programs were written using the Easy 68K editor and assembler. It was a huge help to run the programs in the Easy 68K simulator, to make sure they worked as intended before trying them on my hardware. There’s nothing worse than staring at a non-functional DIY computer with no way to tell if you’ve got a software bug or a hardware one.
Easy 68K assembles programs into Motorola S-record files, which I opened with my EPROM burner software, and programmed into my Flash ROM. That was all I needed to get some basic LED blinker programs going. Physically moving the Flash ROM chip back and forth between the breadboard and the EPROM burner wasn’t much fun, though, so I wrote a quick and dirty bootloader. The bootloader is stored in ROM, and runs when the computer is first turned on, waiting for data to appear at the serial port. The first four incoming bytes define the size of the transfer, then the remaining data bytes are stored sequentially starting at the RAM base address. After the last byte is transferred, the bootloader jumps to the RAM base address to execute the program that was loaded. It’s not fancy – there’s no acknowledgement, or checksums, or facility for alternate load or start addresses. But it’s enough to experiment with new programs without having to unplug the ROM chip each time.
Once I had a working bootloader, I started searching for 68000 software that could be easily ported to this hardware. Lee Davison’s Enhanced Basic for 68000 is well known for being excellent in this respect. All that’s needed is to change a few assembler definitions for RAM base address and size, and to provide implementations for the routines to get or print a character. The rest is just vanilla 68000 assembly code with no platform dependencies. Unfortunately it appears that Lee Davison passed away recently, and his web site is gone. I wasn’t able to find an original version of Enhanced Basic anywhere. In the end, I used an Easy 68K specific version of Enhanced Basic, then ripped out all the Easy 68K specific parts. It took me a while to discover some Easy 68K specific modifications that had been made to the “platform independent” part of the code (naughty, naughty), but it still only took a few hours to get Enhanced Basic up and running on the breadboard hardware.
Next Steps
With 512K of RAM, it might be possible to bootload and run a super-minimal version of ucLinux. Even if it’s not possible, I expect I can learn a lot from the attempt. So I’ll be downloading the ucLinux source and getting familiar with how to build it and modify it. That should keep me busy for a while. 🙂
On the hardware front, I found one potential problem that I’m unsure how to handle. During the first half clock of every bus cycle, the 68K CPU puts its address and data lines into a hi-Z state. And during reset, the CPU puts virtually all of its outputs into a hi-Z state, including the address strobe and other control signals. This is a big problem for my address decoder and other glue logic, because they basically blow up if their inputs aren’t well-defined 0’s and 1’s. At best their outputs will be wrong or at invalid voltage levels. At worst they’ll consume a ton of current or enter some crazy oscillation, injecting noise everywhere in the circuit. I’m not sure why my breadboard prototype doesn’t exhibit problems like this already, but I suspect I’m just lucky. The full-scale 68000 system on a PCB may not be so lucky.
What’s the best way to fix this problem? Other homebrew 68K designs I’ve looked at don’t mention it. I could put a weak pull-up resistor on every CPU output, to gently pull it to a valid voltage level if the CPU isn’t driving it. But that would be a lot of resistors, and it might increase the signal rise/fall times during normal CPU operation, reducing the maximum clock speed that can be reached. Hmmm.
What’s In A Name?
This 68K effort needs a name. My other projects all have vaguely humorous names or name puns: Big Mess o’ Wires, Nibbler (the 4-bit CPU), Plus Too, Floppy Emu, etc. For this project I’m thinking of 68 Kangaroo, keeping with Floppy Emu’s Australian wildlife theme and extending 68K with an -angaroo. Other ideas along the same line of thinking are 68 Katy (my wife might be jealous), or 68 Kale (try it sautéed with garlic). Single Bored Computer also has a nice sound to it, and would be great for online dating. Ah, the possibilities…
Read 18 comments and join the conversationReset Debouncing Gives Me Ulcers

Who knew that getting a decent /RESET signal could be so difficult? I’ve been working on a scaled-down breadboard version of my 68000 system design. It mostly works so far, running a simple program that echoes serial port bytes. (More details soon, I promise.) But I noticed that every time I hit the reset button, it would vomit some garbage characters out the serial port, so I decided to investigate. Poking about with the scope, I discovered that my /RESET signal looked bad, really bad. Convinced that it was something to do with the 68000, I duplicated the reset debounce circuit on a separate breadboard. It’s just a switch connected to ground in parallel with a 10 uF capacitor, and a 10K ohm pull-up resistor to 5V.
The screenshot above shows what happens when I press the reset button. Oh ye gods! That is just horrible. What the heck is going on? First we’ve got the signal jumping up (??) to nearly 8 volts. How on earth does that happen? In other tests, I’ve seen it jump even higher, as high as 10V. Then at the end of all this bouncing switch noise (which the cap was supposed to smooth out), there’s about 12 microseconds of quiet where the signal sits near 0 volts. But then it jumps up to 2.5V near instantly. That should be impossible, as the RC time constant in this circuit is 10^4 * 10^-5, which is 10^-1 seconds or 100 ms (probably much bigger than I need). It shouldn’t be possible for the capacitor to charge that quickly. Something strange and unexpected is happening here.
I know there are better debounce circuits than this – I could use a double-throw switch, or add in a buffer with a Schmitt trigger input, or use a reset IC. But before I first understand what’s going wrong here, I don’t think I’d trust an alternative solution.
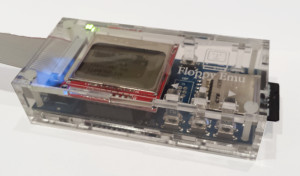
Read 12 comments and join the conversationFloppy Emu Cases are Here!
Custom-made cases for Floppy Emu are finally here, and available for sale now on the Floppy Emu home page! These laser-cut enclosures will keep your board protected in style. The clear acrylic universal case is $17, and fits all models of Floppy Emu boards. The deluxe brown hardboard case fits the Floppy Emu with Floppy Extension Connector, and is $19. Both styles of case require assembly, which takes about 10 minutes and a screwdriver.
The prototype cases are also available for sale at a small discount, including black acrylic and birch plywood. The dimensions on the prototypes are slightly different, so they’re a bit more fiddly to assemble, but once assembled they look and feel the same as the regular cases.
I’m also testing out a new shopping cart interface for the first time, so let me know if you have any trouble while making a purchase.