Backcountry Logger v1 Demo
 The Backcountry Logger is a portable microcontroller-driven device that collects temperature, air pressure, and altitude data, and shows graphs on a built-in screen. It’s intended for hikers, climbers, skiers, and other outdoorsy folks who want to geek out with environmenal data about their activities.
I’ve written extensively already about the design and board layout of the Backcountry Logger, but never described its actual usage in any detail until now. I’d been waiting until I received the custom-designed board back from the PCB house, so I could move the project off the protoboard and onto a permanent frame. The board finally arrived a few days ago, and I had everything assembled after about an hour of soldering. It all worked flawlessly right away, so the transition from protoboard to PCB was very smooth.
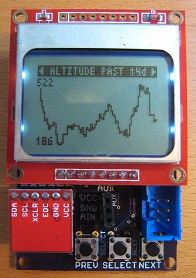
 The logger interface is organized as 16 different screens, and the user cycles through the list of screens using the PREV and NEXT buttons. Each screen displays status text or a graph of historical data. Most screens also have a menu that can be opened with the SELECT button, providing access to further customization and configuration options. Screens are grouped into altitude, temperature, and air pressure sections, with each section having historical graphs at time scales ranging between past 90 minutes to past 14 days.
The main screen shows a customizable summary of environmental data. By default it displays current altitude and temperature, rate of ascent, and time of day, but the contents are fully customizable from the menu. Each of the screen’s six lines can be configured to show one of eleven different statistics, such as weather forecast, current air pressure, and estimated time to a previously-set goal altitude.
 One of my first tests was to take the logger up a nearby hill. Here you can see the 90-minute altitude graph from the test. The graph only goes back about 30 minutes, to the time when I inserted the battery and data collection began. The graph begins with a big spike down to about 300 feet when I calibrated the altitude. I then got in my car, and drove up a hill that’s about 470 feet according to the topo map. At this scale, each pixel on the X-axis reperesents one minute.
 Here’s the 90-minute temperature graph from the same test. It was a hot day, and my car had been sitting out in the sun, so the interior of the car was sweltering. How sweltering? About 112F, according to the logger. Yikes!

 The system screen contains lots of goodies like the firmware version number, current battery voltage, and LCD contrast setting. The system settings can all be edited via the screen’s menu.
 This version of the Backcountry Logger is about 7 cm long, 4.5 cm wide, 2 cm tall, and weighs 1.3 ounces. It uses a 3V CR2032 battery, unregulated. The current consumption is about 1.5 mA when it’s on, and 20 uA when it’s asleep. Depending on how much it’s used, the battery life should be about 8-12 months.
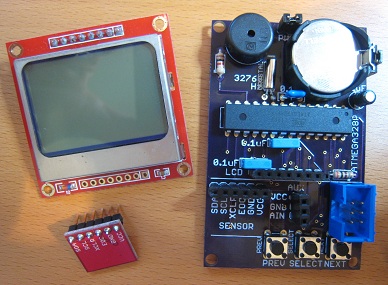
The main board has only one IC: an ATmega328P. The rest of the space is consumed by the battery, piezo speaker, buttons, a few passive components, and headers. The LCD and BMP085 pressure/temperature sensor are mounted on breakout boards that plug into the headers.
I’m planning to make a version 3 of the Backcountry Logger that’s substantially smaller and lighter. (Don’t ask what happened to version 2.) This version will be just 5 x 3 cm, and will use a tiny OLED screen that’s higher-resolution than the LCD but physically much smaller. All the parts in version 3 will be surface mount, instead of this version’s through-hole parts. Because the OLED requires more current than the LCD, version 3 will use a single AAA battery with a voltage booster in place of the CR2032 battery. Check back in a few weeks, and I hope to have a version 3 demo to share.
7 Comments so far
Leave a reply. For customer support issues, please use the Customer Support link instead of writing comments.


Some minor problems today when I look the logger out for the first real hike. Everything was fine for about 20 minutes, but then it started to spontaneously reset. It reset at least six times over the course of two hours, including one period where it reset three times in just a few minutes. I was getting pretty irritated.
I was wearing the logger on a lanyard around my neck, and it was bouncing around pretty forcefully. I thought the jarring and banging must be causing a short or open circuit somewhere, but try as I might, I couldn’t reproduce the problem by smacking, bending, twisting, or otherwise abusing the hardware. I even ran for a couple of minutes to generate maximum jarring, but couldn’t reproduce the problem.
After an hour and a half, I finally discovered that the real problem was more interesting, and more gross. After all that hiking and running in full sun and 90 degree heat, I was sweating hard and my shirt was a bit damp. I didn’t think it could possibly be damp enough to cause a short, but I was wrong. I discovered that if I pressed the solder side of the board against a damp area of my shirt, I could force the logger to reset every time. I guess a sweaty bit of polyester is a better conductor than I thought! After I tied to the logger to my pack instead of hanging it on my neck where it hung against my shirt, I had no more problems.
This is such a nice looking device.
If it were me, I’d be totally satisfied with this version… Yet you continue to improve the design.
Excellent work and I’m looking forward to seeing version 3.
Any chance to see the source code?
Yeah, I need to make a project summary page for this. I’ll post it there.
Have you run any tests on your battery life? And are you keeping time on the Atmega chip?
BTW what happened to version 2?
I measured the current draw as 20 uA when sleeping, and 1.5 mA when awake, and used that to estimate expected battery life from a 220 mAh battery. I guess we’ll see if I was right in 8-12 months!
It’s using a 32768 Hz crystal to keep track of time on the ATmega, right. I didn’t try to measure the accuracy, but after 4 days it’s still within a minute of the watch I used to set the initial time.
Version 2 was a very minor fix for version 1. I never built v1, and in fact what’s shown here *is* version 2, but I forgot to update the silkscreen so it still says v1. Then when I designed the shrunken version, it was named version 3. Boring story… I told you not to ask. 🙂
Your project is so interesting, I am looking forward to see your version 3.
I would like to contact with you, would it be possible to get your Email address? Appreciated.