Video System Design
The BMOW video system design is done! Save for that one question about the correct current source setup that I mentioned previously, everything is nailed down to the last detail. I tried to cram in the maximum amount of flexibility that I possibly could, without making the hardware requirements too crazy. All told, I think I spent about a month working on the design. Now I just need to build the darn thing, and pray that it actually works!
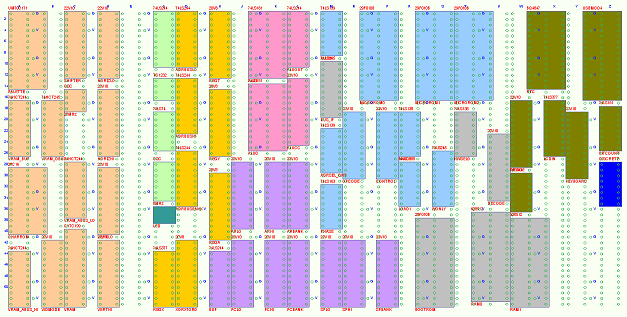
The finished design uses 14 ICs and a handful of other components, making it BMOW’s biggest subsystem. Keeping the required board area small was an important goal, since I’ve nearly filled the BMOW system board, but I’d like to leave some free space for an eventual audio subsystem. As it turned out, I used about 80% of the remaining free space for the video components, which leaves a small but non-zero area for audio. The video system components are drawn in tan, at the left side of the board layout diagram below. Click the image to see a bigger version.
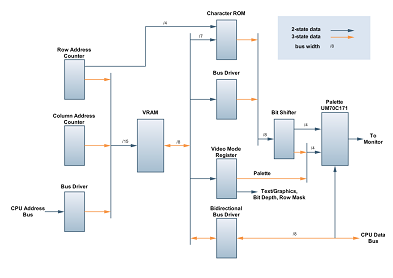
The video system supports display resolutions up to 512×480, with up to 256 colors possible at lower resolutions. A 64-column text mode is also provided, with a hardware cursor and 8×16 font glyphs stored in a character ROM. Bitmapped graphics support a variety of resolutions and color depths. Many video settings can be changed on a line-by-line basis, allowing text and graphics using different palettes and color depths to be mixed within a single screen. The following block diagram shows the major functional units. Click on the image to see a larger version.
Overview
All video data is stored in a 32K static RAM. During normal operation, 4 GALs serve as row and column counters, generating the required VRAM addresses as well as sync, blank, and other timing signals. When the CPU wishes to read or write to VRAM, the row and column counter outputs are disabled, and the CPU address is driven onto the VRAM address bus. Because there’s no explicit synchronization between the CPU and the video circuitry, the CPU may access VRAM while the video circuitry is drawing the visible portion of a line to the screen. If that happens, video noise or “snow” will appear briefly on the screen. While this video snow is undesirable, I’m hopeful that it will be tolerable in practice. The snow can also be avoided entirely, by constraining the CPU access through software so that it only occurs during the vertical blank period, when nothing is being drawn to the screen.
In graphics modes, the VRAM data is passed directly to the bit shifter without translation. Text mode operates differently, however. Text VRAM data is used as the address to the character ROM, along with the lowest 4 bits of the row count, to select the right portion of the font glyph to display. The selected portion of the font glyph is then passed to the bit shifter. Seven bits of VRAM data are used to select the character, providing for 128 different characters. The eighth bit is passed to the bit shifter as an “inverse” flag, so any character can be made to appear inverted by changing a single bit in VRAM. This can be used to indicate the cursor position, or to highlight a region of text.
In some video modes, the first byte of row data defines mode settings for that line on the screen. The character ROM can be turned on and off, palette selections can be changed, and color depth can be modified, all within different portions of the same screen. For example, a game might set up a screen that’s predominantly in 16 color mode. But it might set one palette of 16 colors for the upper half of the screen, another palette of 16 colors for the lower half, a small area of 256 colors along the top border for a status display, and a row of text along the bottom border for the score. For those modes that use it, the mode settings are latched directly from VRAM into the VIDMODE register at the beginning of each line. For the other modes, VIDMODE is latched once per frame, during the non-visible portion of the frame.
Once data reaches the bit shifter, it’s shifted out at a rate dependent on the current color depth, and passed on to the palette chip. For 2, 4, and 16 color modes, the bit shifter provides four bits of the palette data, and the VIDMODE register provides the other four. In effect, using VIDMODE allows for an additional four bits of data per pixel, but those four bits are shared by every pixel on the same line. In 256 color mode, the bit shifter provides all eight bits of the palette data, and the VIDMODE output is disabled.
The video circuitry uses the UM70C171 palette chip that I’ve mentioned several times before. It combines a 256-entry palette RAM and three D-to-A converters into a single chip. A similar result could be achieved by using a standard SRAM for the palette and three separate DACs, but at the cost of increased complexity and required chip count.
Video Modes
Four bits of control data govern the basic video resolution settings: two for the vertical resolution, and two for the horizontal. Decreasing the horizontal resolution increases the color depth, so that the number of data bytes per line remains constant, with some exceptions. Some modes use the first byte or two of row data for mode settings, with a consequent reduction in horizontal resolution. The character ROM may be turned on in any mode, but will only produce recognizable characters in 2 color mode. In the other modes, the font glyphs will effectively become small colored bitmaps, which might permit for some interesting effects. The 16 primary video modes are:
| 0 | 504×200 @ 2 colors | mode byte per line, 63×25 text with character ROM |
| 1 | 504×200 @ 4 colors | mode byte per line |
| 2 | 252×200 @ 16 colors | mode byte per line |
| 3 | 126×200 @ 256 colors | mode byte per line |
| 4 | 512×240 @ 2 colors | 64×30 text with character ROM |
| 5 | 512×240 @ 4 colors | |
| 6 | 256×240 @ 16 colors | |
| 7 | 128×240 @ 256 colors | |
| 8 | 504×400 @ 2 colors | mode byte per line |
| 9 | 252×400 @ 4 colors | mode byte per line |
| 10 | 126×400 @ 16 colors | mode byte per line |
| 11 | 63×400 @ 256 colors | mode byte per line |
| 12 | 512×480 @ 2 colors | |
| 13 | 256×480 @ 4 colors | |
| 14 | 128×480 @ 16 colors | |
| 15 | 64×480 @ 256 colors |
It looks like a pretty random assortment of resolutions and colors, but they all fall directly from the use of the resolution control bits. A few notes:
- Check out mode 12, at 512×480! That’s a lot of resolution.
- Mode 7 is probably best for displaying digital photos or smooth color gradients.
- Mode 2 at 252×200 and mode 8 at 504×400 have the pixels that are closest to being square.
- The 200 and 400 line modes are handy for adjusting the pixel aspect ratio. Otherwise the higher resolutions of the 240 and 480 line modes are probably more useful.
For applications where there’s lots of animation happening, significant amounts of VRAM data may need to be modified by the CPU each frame. If this becomes prohibitive, a bit in the VIDMODE register can be set to enable line-doubling mode. In this mode, the least significant bit of the row count is masked out, so that only data for the even rows is read from VRAM, and the same line is repeated for odd rows. This cuts in half the amount of data that must be modified by the CPU, and enables reducing the vertical resolution to as low as 100.
For the curious, I’ve posted the complete schematic diagrams and GAL equations for the video circuitry. Find a bug, or suggest an improvement!
Food for Thought
A few things didn’t work out as I’d hoped with the design. The idea of changing the video settings line-by-line is cool, but it complicated matters quite a bit, and I never did manage to iron it all out perfectly. I think that modes 9, 10, and 11 will use the mode byte correctly, but will also display it as a visible pixel. Oops.
One tricky wrinkle I didn’t anticipate is that some modes involve different byte rates than others. For 512 horizontal pixels at 1 bit-per-pixel (2 colors), a new byte must be loaded from VRAM every 8 pixels. But for all other modes, a new byte must be loaded every 4 pixels. That means that the pipeline delay is different, so the time between column count zero and the first visible pixel of the line appearing on screen is different. If combining 1-bit lines with 2, 4, or 8-bit lines in the same screen, the lines will start 4-pixels apart horizontally, so the left and right screen edges will look ragged. What’s worse, I can’t even generate the correct timing signals to make ragged lines, since I’ve run out of space in all the programmable GALs. I discovered this only at the 11th hour. My work-around is to use the same timing signals for all lines, regardless of color depth. This suppresses the first pixel of 2, 4, and 8-bit lines, and tacks it on to the end of the line instead. I can compensate for this wrap-around behavior in software, but it’s a pain.
Read 4 comments and join the conversation4 Comments so far
Leave a reply. For customer support issues, please use the Customer Support link instead of writing comments.


Can’t wait to see it! Very well thought out design. Now as for audio… I suppose you could just store it in RAM/ROM and have the CPU select the sound by address, and have a counter shift through the whole sound, so you could have fairly decent (8 bit, 22050khz 0r 8khz)
That gives about 40+ nanoseconds per sample. Side note: I found a few old motherboards with some 20nS and 15nS sram DIPs on them. YOINK! a few kilobytes, and around 6 or so of them.
w2157ak-20 and w2465ak-15 Not tested, but if you could use them, they’re free.
I think I’ve got a cluster of SRAM devices around here as well. They are from IDT as it happens. Never been used by me as it also happens. If you need them as well, they are also free.
In this case this also means completely free of any obligations. All I would do is send them to you via a padded SASE sent in a similar container.
Thanks guys. I might be able to find a use for some parallel SRAMs. I think typical computers of the 80’s used 1-bit SRAMs though, and you needed 8 of them to get 8-bit wide memory.
The video system work is still progressing, but very slowly. I’ve been watching the Olympics and generally finding any excuse to avoid spending time connecting wires. It is moving forward though! I’ve got the hsync/vsync working, and it’s software switchable for different video modes, verified on the scope. Next I’m adding the VRAM itself and the bus interfaces, and the output circuitry will come last.
Meanwhile I’ve also been daydreaming about custom PCBs, CPLDs, and 68000s, but that’s another project.
Now that I think about it, typical computers of the 80s didn’t use SRAM at all, did they? They used DRAM, since it was cheaper.